Sections
Load Page
The PfT window has eight tab pages. These set out the work-flow to follow as you create your output. PfT opens with its Load tabbed page selected. As the window opens PfT processes the emails you have selected, breaking down the sub-messages and collecting the data it needs. If this takes more than a couple of seconds then an an orange panel displays information about the number of emails and sub-messages being processed. The length of time this takes will depend on both the number of emails selected and the complexity and number of sub-messages in each. In case the process takes too long there is a Cancel button. If you click this the process stops and the window closes, allowing you to think again about the number of emails selected.
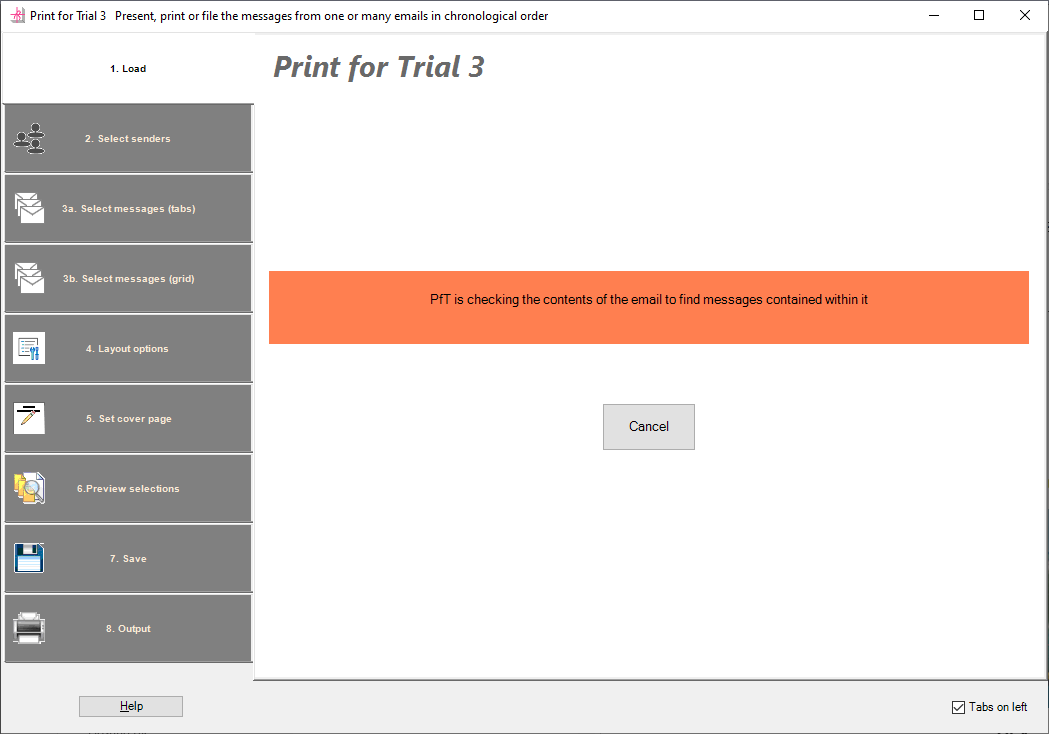
Once the process is complete the orange panel and Cancel button disappear.
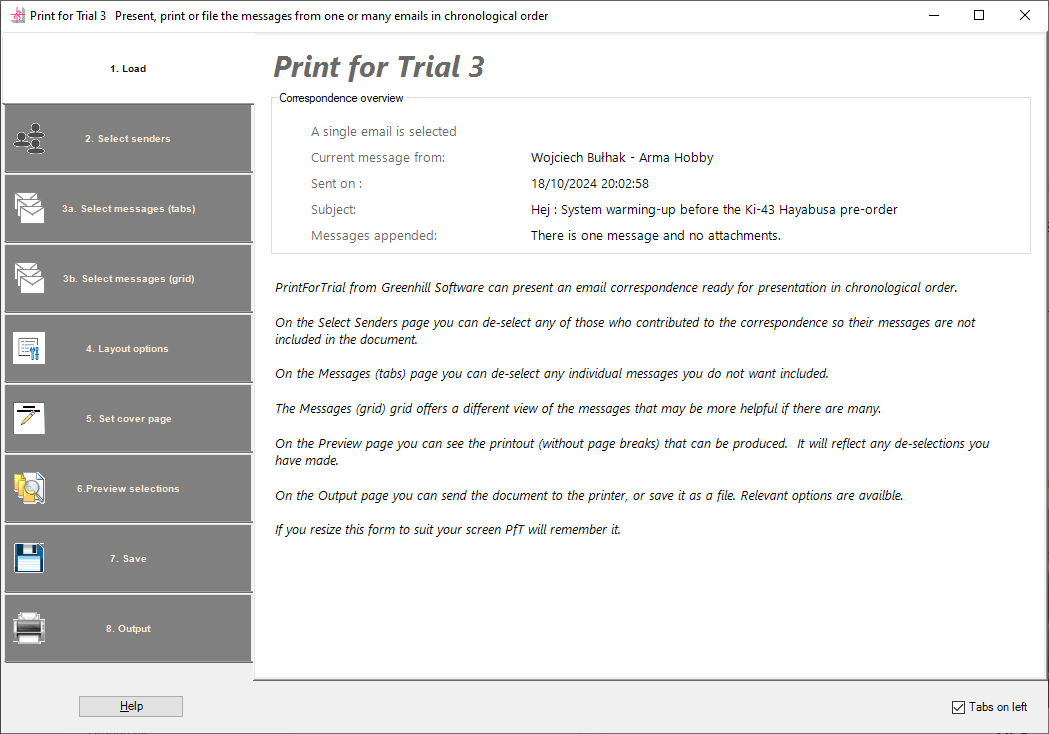
The upper part of the welcome page gives summary details of the email or emails selected while the lower part indicates the purpose of each of the tabbed pages.
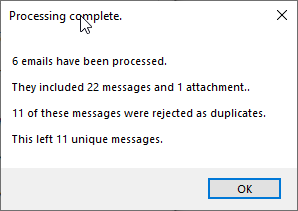
If you have selected two or more emails there is a pop-up message summarising what PfT has processed.
Be aware that there will be limits to how much can be processed. The limits will be determined by your computer and the programs running as well as the size and number of emails being processed. One user reported problems but she was trying to process over three hundred emails as a single document.
Senders Page
The next page lists the people who have sent messages in this correspondence. There is a tick-box for each person in the correspondence and, by default, all are ticked. If you un-tick any of the senders then messages from them will not be included in the output.
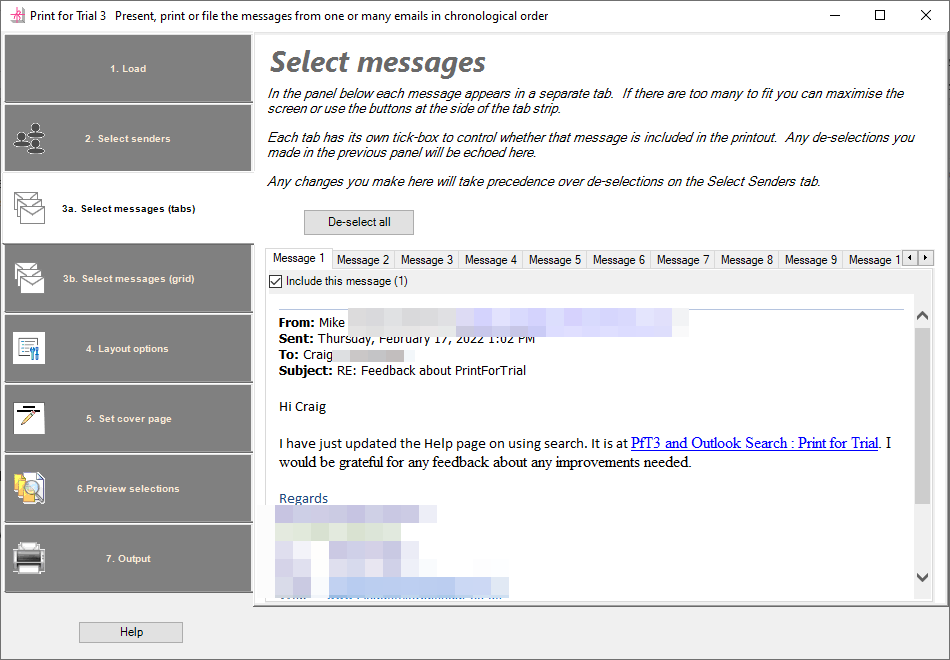
Messages tabs page
The next tab page displays each of the messages in a separate tab. There is a select tick box for each message and if you have deselected a sender on the previous page their messages will be de-selected here. You can choose to select or de-select any messages and these choices will over-ride any made on the Senders page.

Messages Grid Page
This page also displays the messages in the correspondence but in a grid layout. This was added for PfT2 because if multiple emails are being processed the number of messages involved may be significantly greater and the grid gives a better overview.
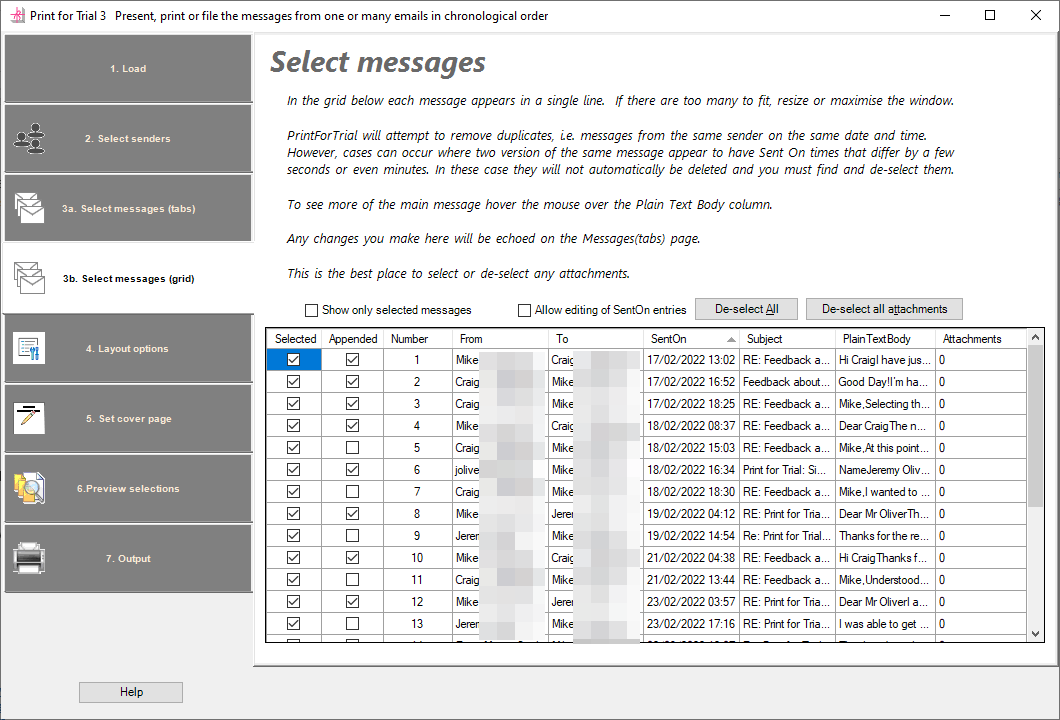
Grid Page: Resize the screen or columns for a better view
You can adjust the size of the form to give the best view possible on your screen. Use the Maximize square button at the top right hand corner of the window or re-size the form by dragging a corner. You can also re-size the columns: get the mouse pointer on the line between two headings, for example between the heading Subject and Plain Text Body. (The Plain Text Body column holds a copy of the message’s text.) The mouse pointer will change to a two-headed arrow which you can drag left or right to change the width of the column.
PfT will remember the size you left the form and show it in the same size and position the next time it appears.
Grid Page: Take a peek at the message’s text
Also, if you hover the mouse above the column some of the text will be shown in a pop-up. In the image above the form is not wide enough to show the Subject in full but the mouse has been held over it an the full subject of the email appears as a pop-up. The same technique works with the Plain Text Body entries.
Grid Page: Spotting duplicates
When PfT processes more than one email there will usually be duplicates among the appended messages. PfT will try to eliminate these duplicates, however, there may be occasions when it fails. The grid view is the best place to spot any duplicates that have slipped through and de-select them so they do not appear in the final document.
Grid Page: Attachments
The Message (grid) page is where you can see attachments and decide whether they should be selected.
From version 2.0.7.0 a pair of buttons have been added above the grid to help with selecting and de-selecting items when dealing with a large number. The first button selects or deselects all messages and attachments. The second button just selects or de-selects attachments.
Special considerations apply to attachments which are explained on the Attachments page.
Grid Page: Invalid Dates
If you are processing a single email then PfT simply reverses the order of the messages. However, if you are processing more than one email then PfT needs a way to keep all the appended messages in the right order. It does this using the date and time of each message. However, in the case of messages appended to the current email all that PfT has to go on is the set of details at the start of the appended message. This usually contains a line such as:
Sent: 05 September 2020 09:20
However, the format of the date and time can vary considerably depending on the settings on the machine where the message was appended to the email. PfT has to convert that text date and time into a consistent format that can be sorted. PfT can handle a wide variety of formats but it is just possible that you may encounter one that PfT cannot handle. If this happens the resulting date will be invalid.
If there are any invalid dates you will have received a warning while PfT was processing the emails. On the grid invalid dates will be have a red background and because, when PfT is processing more than one email, it uses these dates to sort the messages the message with the no date or an invalid date will be at the top.
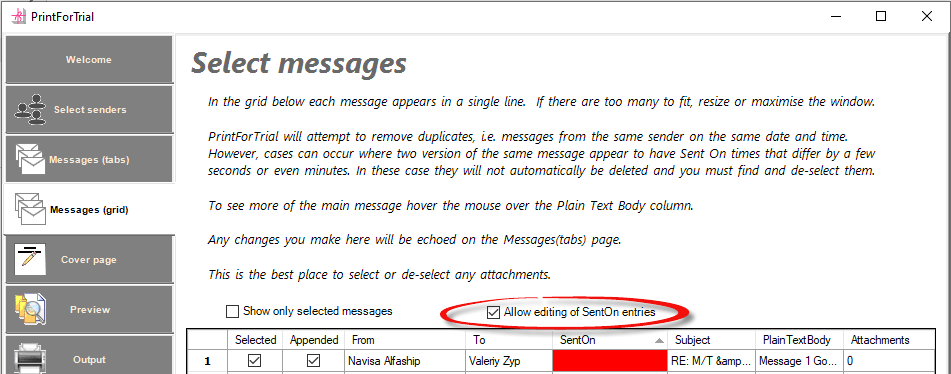
In the example above, PfT has been unable to work out the date for one appended message so it is treated as having the minimum date possible. This results in it being sorted to the top of the grid and given a red back ground. By default, you are not able to edit the messages in the grid but when processing more than one email an extra tick box is shown which will allow you to make the SentOn column editable.
If you can work out what the date and time should be then you can enter the correct value here. Be aware that as soon as you press the enter key or use the arrow keys to move off the row you are editing then the records will be sorted and the one you have just edited will jump to its correct position.
It may be useful to look at the message in the Messages (tabs) page where you can see the text value that has caused the problem.
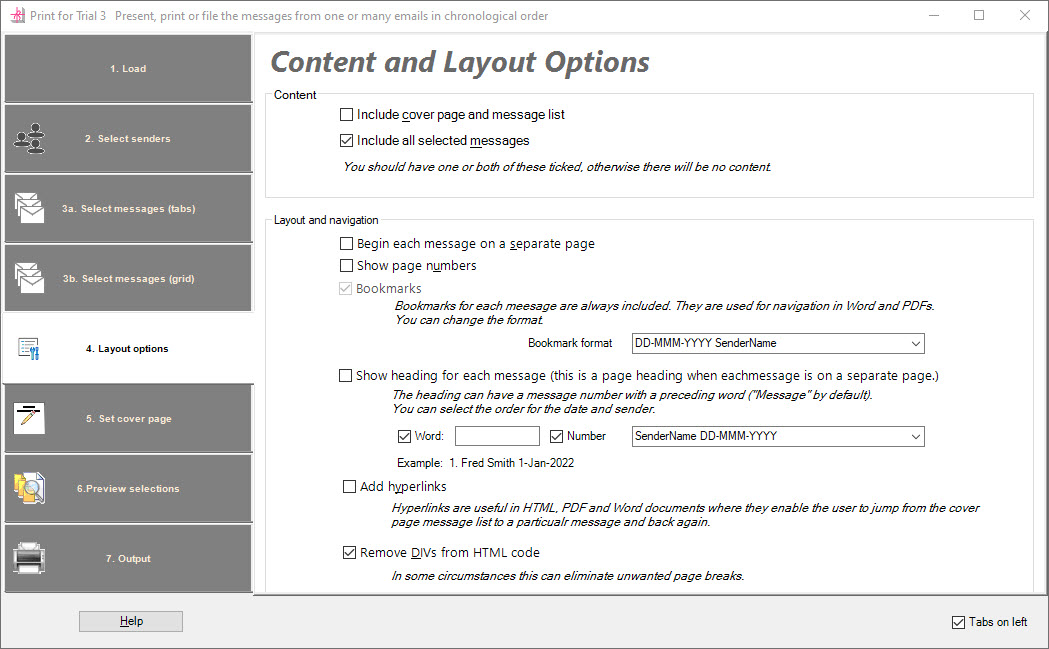
Layout Options
On this page you can set a number of variables to control the appearance and navigability of your output.
Include cover page and message list
Include all selected messages
Although you would usually use PfT to print the selected messages there may be times that you want just the cover page with its summary list of messages. Also, you may not want the cover page. If you click any of the Print or Output buttons with both of these unticked then a warning will be displayed as there will be nothing to include in your document.
Begin each message on a separate page
If you leave this unticked the there will be no page-breaks in the document. If you output to HTML page breaks will not show up when viewing the file on screen but will be there if you print the file.
Show page numbers
This option simply displays page numbering in a footer. In Word and PDF format the title of the document is also included in the footer.
Bookmarks, headings and hyperlinks
Hyperlinks and bookmarks are not relevant if you want only printed copy. However, if you want to use the documents produced by PfT either alone or as part of a larger collection they are very useful aids to navigation.
PfT always inserts an invisible bookmark at the start of each message. Word and most PDF viewers enable you to see the bookmarks and use them to jump around the text. This is particularly useful if you use multiple PfT documents included as part of a larger document – the bookmarks will still be available in the new large document. You can choose the format of the bookmark to set the order of the date and sender. See Bookmarks.
You can choose to include a header for each message. If you also have chosen to have each message on a new page then the header is a page header. If you produce a Word document the header is a Level 2 heading and will appear in a contents list produced automatically by Word if you choose to add this. You can configure a number of parts of the heading. Firstly is a word which is “Message” by default. You can change this, perhaps to a different language, or omit it. You can include the message number. (This is not relevant and is not included when the output is a separate document for each message.) Finally, as with bookmarks, you can set whether the message date or sender comes next.
Hyperlinks are most useful when producing an HTML documents because bookmarks will not be available. However, they are available in Word and PDF documents. When PfT produces a single document with a cover page, whether HTML, PDF or Word, hyperlinks on the cover page enable the user to jump straight to the relevant message and a link at the end of each message enables the user to jump back to the contents page.
Remove DIVs from HTML code
If this option is on all the <DIV> elements will be removed from the HTML code of the emails. This can have the effect of preventing unwanted page-breaks. It is possible, however, that it could cause other problems. If you have an email where removing the DIVs causes more problems than it solves, please contact us.
Cover Page
Here you can set up an optional cover page for your output. You can enter your own title and introduction or use the defaults.

Preview Page
The preview page does what it says, reflecting any selection of messages you have made, your cover page settings and some the options that appear on the Print page. The preview shows hyperlinks, if selected, but not page breaks.
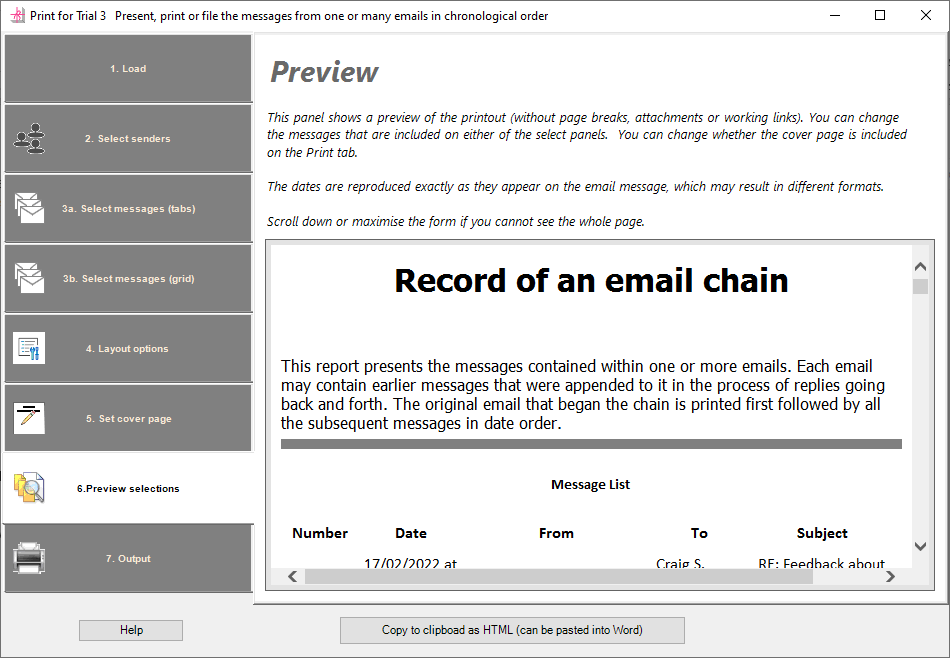
Note that from version 2.0.4.0 there is a button below the preview pane that enables you to copy the preview to the Clipboard. This enables you to paste it directly into Word and will assist the creation of complex documents. This feature is not available while in Evaluation Mode.
Save
The Save feature was added for PfT4. It allows you to save PfT’s working dataset and reload it later. The dataset is the intermediate data that PfT creates from the emails it processes. The main component is a version of each message that can stand by itself. This dataset is what you see when you look at the Messages – Tabs or Messages – Grid pages. It is what PfT uses to create the output in whatever form you have selected.
When you save the dataset it is placed in a subfolder of PfT’s working space in the Windows AppData folder along with any relevant attachments and embedded images.
Once there is one or more datasets saved then the Select a correspondence file item in the Select content section of the menu is enabled and its drop-down list will show the names of the different correspondence datasets available.
Output page
On this page you can output your work to either a printer or to one or more files. You may be preparing evidence to be presented on paper or to be viewed as files on screen. The options here cater for both possibilities.
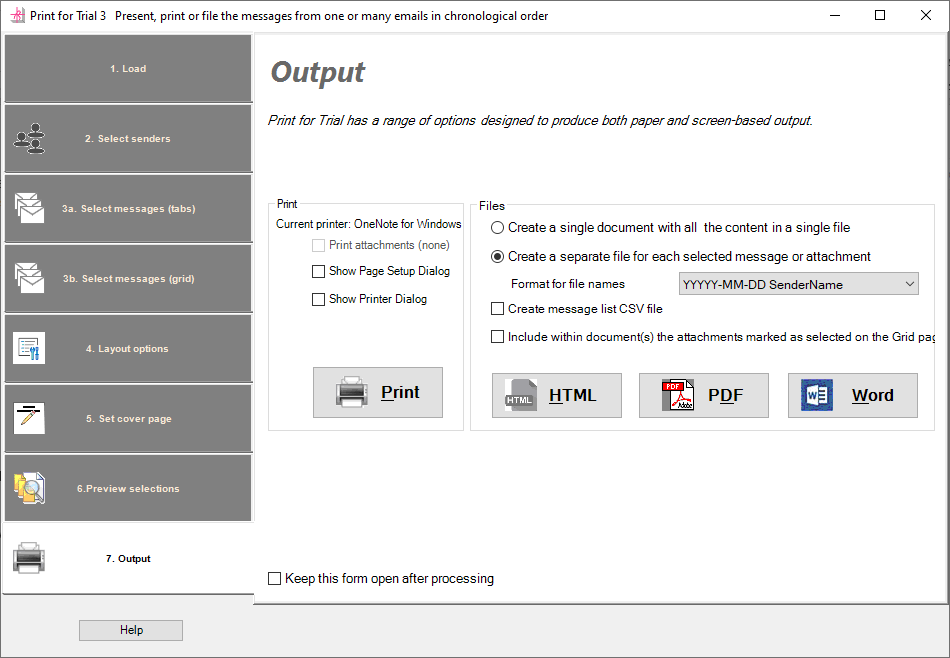
The top section of the screen allows you to set a range of options.
The Print section shows the currently selected printer so you can decide whether or not you need to show the Printer Dialog to change it.
The Print Attachments tick-box is not available if there are no attachments for the currently selected emails. When printing attachments PfT uses Window’s ability to use the default application for each file type to do the printing. In many cases the application will not be visible but in some the application might appear on screen before printing the attachment. It is not recommended to print Excel attachments without viewing them first as they may not be the right size and shape for simple printing.
The option to show the Page Layout dialog before printing allows you to specify header, footers and margins.
When you click the button to Print PfT will tick the box to keep the form open if it is not already ticked in order to prevent the form closing straight away. This is because PfT makes some changes to the computer settings before it prints and reverses the changes when the PfT window closes. However, if the window closes straight away it is possible that the settings get changed back before printing has taken place with the result that the printer selected and the page break and footer page-numbering may not be as expected.
FILES
In the Files section three buttons give you the choice of producing output as HTML, PDF or Word files.
Above the buttons are a number of relevant options.
You can choose whether to create your output as a single file (containing all the selected messages) or a series of files, one for each message. The multiple files option may be useful if you intend to integrate the messages into a wider-ranging report or document.
Both the Word and PDF files are created using Word behind the scenes. The HTML code of the messages is converted into a Word document and, if required, that is then saved as a PDF.
If you choose to output as a single file, PfT will ask you for a file name to use and then show the document on screen.
To display the PDF and HTML files PfT uses whichever program you have set up on your machine to handle that type of file.
If you choose to output multiple files then further options will appear.
First you have the choice of five different formats for the file names for each message:
- YYYYY-MM-DD SenderName
- YYYYY-MM-DD from Name to Name
- SenderName DD-MMM-YYYY
- DD-MMM-YYYY SenderName
- DD-MMM-YYYY from Name to Name
The first two start with the Sent On date in the format with the year first (YYYY), then the month (MM), then the date (DD) and then the time. This may look unfamiliar but has the significant advantage that when files are sorted by their file name they will be in date order. There are two variations on this: the first has the date and time with the name of the sender; the seconds adds the name of the recipient. The other three options use the default date format as set by Windows on your machine. In the UK this will normally be DD-MM-YYYY.
When you output to multiple files a cover page list of messages is not usually helpful as you will be combining the messages with other documents. However, users have asked for the message list to be available as a CSV file as a basis for further customisation. If you tick the box there is a choice as to what is included in the list.
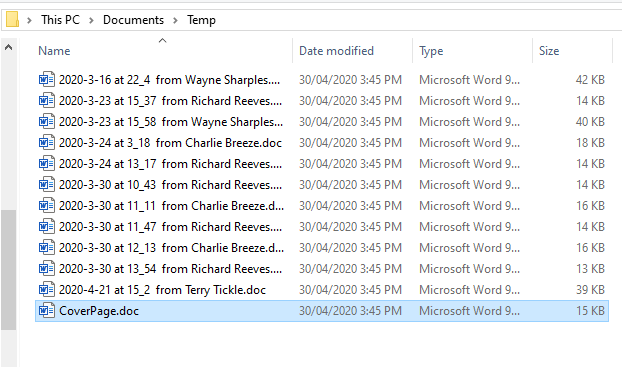
When you click one of the output buttons (HTML, PDF or Word) the if you chose to output multiple files PfT will ask you to choose a folder in which to save them, or to create a new one. If the folder exists you will be told how many files are in it an given the option of deleting them all before saving the new ones. Then the folder will be opened to show the files. The image below shows how the default format for file names results in the files being sorted in date order if File Explorer’s default of sorting by file name is not changed.
Evaluation restrictions on output
While you are evaluating the software without having bought a licence the Preview page will show you the messages in full. However, when you come to output to either a printer or to files you will be able to produce and print only the cover page and the first message. We want you to be able to check that PfT works as expected on your system but not more. See the Evaluation page.
To try it it out download and evaluate.